Home/Blog/How to Use a Fire Extinguisher: Step-by-Step P.A.S.S. Technique (With Animated Photos & Video Demo)
Safety Training & Operations⏱ 7 min read📅 September 9, 2026
How to Use a Fire Extinguisher: Step-by-Step P.A.S.S. Technique (With Animated Photos & Video Demo)
Master the life-saving P.A.S.S. fire extinguisher technique with step-by-step instructions, authentic on-site drill photos, standoff distance guidelines, graceful video demonstration, and critical fatal errors to avoid during emergencies.
Author: BSS Fire Engineering Team•Region: Jammu & Kashmir
⚡
Key Technical Takeaways
✓P.A.S.S. is the universal 4-step framework: Pull the pin, Aim at the fuel base, Squeeze the lever, Sweep side to side.
✓Always establish an unobstructed escape route directly behind your back before initiating extinguisher discharge.
✓Maintain an optimal standoff distance of 6 to 8 feet (1.8 to 2.5 meters) with wind or ventilation draft blowing from your back toward the fire.
✓Aim strictly at the base of the burning material — spraying leaping flames allows thermal updrafts to disperse extinguishing powder without suffocating the fuel.
✓Extinguishers have limited discharge duration (12 to 20 seconds for standard 4kg–6kg ABC units); continuous, steady sweeping across the fuel base prevents rapid re-flash.
✓Any discharged extinguisher, even if used for only 2 seconds, must be immediately taken out of service, tagged, and professionally recharged per IS 2190.
Interactive Operational Drill Matrix • IS 2190 Standard
Master the P.A.S.S. Technique Step-by-Step
Click any step below to review the authentic on-site demonstration photo, physical mechanics, and safety rules.
STEP01/04
Twist & Pull Pin Ring
P — PULL THE PIN
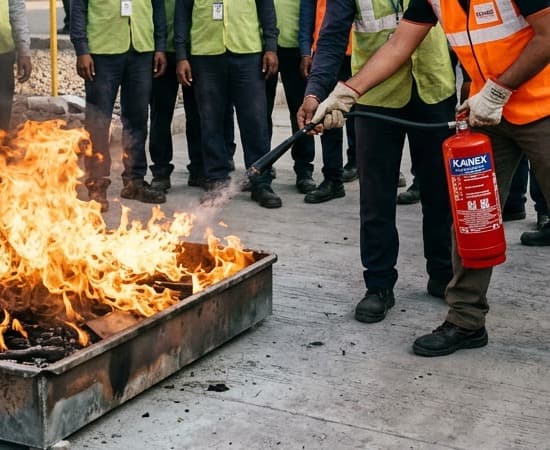
📷 BSS Fire On-Site Live Drill Demo✓ Field Verified
Pull Force
15–20 N
Seal Type
Tamper Plastic
Handle Grip
Lower Handle Only
Operational Step 01 Execution
PULL THE PIN: Break Tamper Seal & Release Discharge Mechanism
▶ Physical Execution Protocol
Grasp the extinguisher firmly by the LOWER carry handle with your non-dominant hand. With your other hand, loop your index finger through the metal safety ring, give it a quick quarter-turn twist to shear the plastic tamper seal, and pull the pin straight out horizontally.
⚡ The Science: Why This Works
The safety pin locks the spring-loaded discharge spindle. Removing the pin allows the mechanical cam to press down on the valve core to release pressurized nitrogen.
⚠️ Fatal Error to Avoid
DO NOT squeeze the top operating lever while pulling the pin! Squeezing binds the pin into the valve housing under pressure, making it physically impossible to remove.
🛡️
Stance & Egress Directive:Keep the extinguisher upright on the ground or held firmly at waist level. Never point the nozzle toward your face or bystanders while pulling the pin.
1. The 10-Second Pre-Discharge Assessment (Fight or Flee Decision)
Portable fire extinguishers are engineered strictly for first-aid incipient stage fire fighting — extinguishing small, localized blazes before they escalate into structural flashovers. Before unhooking an extinguisher from the wall bracket, you must execute a rapid 10-second mental safety assessment:
1. Has the building fire alarm been sounded and emergency response initiated? Never fight a fire in isolation without alerting occupants and calling emergency services.
2. Is your egress route guaranteed? Position yourself with an unblocked exit door or escape stairwell directly at your back. Never allow the fire to position itself between you and your exit.
3. Is the extinguisher pressurized and operational? Look at the pressure gauge located on the valve neck. The needle must be firmly in the GREEN operable sector (typically 12 to 15 Bar). If the needle is in the RED zone, the propellant charge is lost, and the unit will not discharge.
4. Is the agent compatible with the fire class? Using water on an electrical panel or grease fryer creates catastrophic flash steam explosions. Verify the cylinder label matches the burning fuel.
The 2-Meter Ceiling Rule (When to Evacuate Immediately)
If the flames are taller than 2 meters (head height), if thermal smoke has descended below shoulder level, or if the fire is spreading faster than walking pace, ABANDON the extinguisher immediately. Close doors behind you to compartmentalize smoke and evacuate via fire stairs.
2. The P.A.S.S. Framework: 4 Core Principles
During a fire emergency, acute stress triggers adrenaline surges that degrade fine motor skills and rational decision-making. The P.A.S.S. acronym was developed by international fire safety organizations (NFPA 10) and codified in Bureau of Indian Standards (BIS IS 2190) to distill complex mechanical operations into four intuitive, automatic physical actions:
P — PULL the Pin: Break the plastic tamper seal and release the mechanical lock on the discharge spindle.
A — AIM Low at the Base: Target the physical fuel source where chemical combustion occurs, rather than the leaping flames.
S — SQUEEZE the Operating Lever: Depress the upper handle to actuate the valve core and release pressurized extinguishing agent.
S — SWEEP Side-to-Side: Blanket the entire width of the burning fuel perimeter until all visible flames are extinguished.
Use the interactive module below to inspect each step in detail with authentic live fire drill demonstration photographs and critical safety directives.
3. Step 1: [P] - Pull the Pin (Tamper Seal Break)
The metal safety pin passes directly through the upper operating lever and lower carrying handle, locking the spring-loaded discharge spindle to prevent accidental discharge during transit or maintenance.
To pull the pin cleanly without struggle: Hold the extinguisher upright using the LOWER carrying handle with your non-dominant hand. With your dominant hand, loop your index finger through the pull ring. Give the ring a quick quarter-turn twist — this shears the brittle plastic tamper-evident inspection seal with minimal effort — and pull the pin straight out horizontally.
Fatal Error to Avoid: Squeezing the upper discharge lever while attempting to pull the pin. When you squeeze the handle, your hand exerts tens of kilograms of clamping force directly across the pin shank, jamming the pin tightly in the valve body. In high-stress drills, panicked personnel frequently bend the pin or shear the ring because they are squeezing the handle while pulling! Always keep your fingers on the lower carry handle only.
STEP 01: PULL
Hold the lower carry handle firmly; loop your finger through the ring, twist to shear the seal, and pull straight out horizontally.IS 2190 Standard Protocol
Mechanical Inspection Rule (IS 15683)
Plastic tamper seals must be inspected monthly during AMC walkthroughs. If a seal is broken or missing, the extinguisher must be weighed and pressure-tested immediately to ensure agent integrity has not been compromised.
4. Step 2: [A] - Aim Low at the Base of the Fire
Establish an athletic, balanced tripod stance 2.0 to 2.5 meters (6 to 8 feet) back from the burning hazard. If the fire is outdoors or in an area with active HVAC cross-drafts, position yourself UPWIND so that heat, toxic smoke, and discharged chemical powder blow naturally away from your face and body.
Grip the flexible rubber discharge hose firmly near the nozzle horn or tip — do not hold it back near the cylinder connection where flexibility causes the nozzle to whip erratically under pressure. Point the nozzle opening directly at the base of the fire — the physical surface of the liquid puddle, burning cardboard, electrical motor, or trash bin.
The Physics of Flame Extinguishment: Visible flames are luminous clouds of burning hydrocarbon gases rising into the air. Spraying extinguishing powder or gas into the upper flames achieves zero extinguishment because thermal updrafts lift the chemical powder harmlessly toward the ceiling. The fire will continue burning unabated until the fuel base is smothered. By aiming low at the fuel-oxygen interface, monoammonium phosphate powder melts into a glassy metaphosphoric acid coating that cuts off oxygen and suffocates thermal chain reactions.
STEP 02: AIM
Maintain a standoff distance of 6 to 8 feet (2–2.5m) and point the nozzle directly at the lowest root where fuel meets oxygen.IS 2190 Standard Protocol
5. Step 3: [S] - Squeeze the Operating Lever
With the nozzle aimed firmly at the base, squeeze the upper operating lever down toward the lower carrying handle with a steady, decisive motion. Depressing the lever pushes a hardened steel valve stem downward, unseating the internal rubber seal.
Inside the cylinder, dry nitrogen gas pressurized to 15.0 Bar (217 PSI) instantly expands, forcing fluidized dry chemical powder down through the central siphon dip tube and out through the discharge hose at high velocity.
Discharge Duration Reality Check: Many people mistakenly believe a 4kg or 6kg fire extinguisher sprays for minutes. In reality, a standard 4kg ABC dry powder extinguisher empties completely in just 13 to 17 seconds of continuous discharge! A 6kg extinguisher discharges in 16 to 22 seconds, and a 4.5kg CO2 extinguisher empties in 10 to 14 seconds.
Avoid hesitant tapping or erratic pumping of the lever. Rapid on-off pumping bleeds propellant gas pressure without maintaining the continuous chemical concentration needed to knock down flames. Maintain firm, steady pressure until the flame collapses.
STEP 03: SQUEEZE
Depress the upper operating lever down toward the carry handle with a firm, continuous grip to initiate full discharge.IS 2190 Standard Protocol
Cryogenic Burn Warning for CO2 Extinguishers
When operating a Carbon Dioxide (CO2) extinguisher, NEVER hold the discharge horn or metal horn connection with your bare hands. Liquid CO2 expands into gas at -78.5°C (-109.3°F), causing instantaneous cryogenic skin necrosis. Always hold the insulated handle or rubber grip provided.
6. Step 4: [S] - Sweep Side-to-Side Across the Fuel Bed
Direct the chemical stream at the front edge of the burning area and sweep the nozzle from side to side in a smooth, continuous 45° to 60° fan pattern. Imagine using a broom to sweep dirt across a floor: your objective is to lay down an unbroken blanket of extinguishing powder across the entire surface area of the fuel.
As the front edge of the fire collapses, cautiously advance forward one step at a time, continuing the side-to-side sweeping motion until you reach the rear boundary of the fire.
Watch for Flashback and Thermal Re-ignition: Once all visible flames are extinguished, DO NOT turn around and walk away. Hot metal, liquid hydrocarbons, and smoldering wood embers retain sufficient thermal energy to reignite spontaneously if exposed to fresh oxygen. Slowly back away from the hazard while facing the extinguished area, keeping the extinguisher pointed forward in case of a sudden flare-up.
STEP 04: SWEEP
Sweep the nozzle in a continuous 45 to 60 degree horizontal arc across the front edge of the burning fuel, advancing steadily.IS 2190 Standard Protocol
7. Live On-Site Video Demonstration & Tactical Analysis
To see the P.A.S.S. technique executed in real time, review the live on-site fire drill demonstration recorded during an industrial training session below. Notice the operator's stance, distance maintenance, and decisive sweeping motion:
Live Field Demonstration Video
Live Field Demonstration: Fire Extinguisher P.A.S.S. Technique
HD Reference Drill
Compact live drill reference • Watch operator stance, pin pull, base aiming, and rapid flame knockdown
Key Execution Milestones in Video:
0:05Stance & Standoff Distance
0:15Twisting & Pulling Safety Pin
0:28Aiming Low at Fuel Base
0:42Continuous Squeeze & Sweep Knockdown
Field Note: Notice the operator maintains an unobstructed exit path behind them, holds the discharge hose near the tip for directional stability, and applies continuous side-to-side sweeping across the fuel base until total suppression is achieved.
8. Fire Extinguisher Agent Compatibility Matrix (IS 2190 & IS 15683)
Executing the P.A.S.S. technique flawlessly will still fail if the wrong extinguishing agent is applied to the fire. The table below outlines the primary extinguisher types, their certified fire classes, and the catastrophic dangers of agent mismatch:
Displaces atmospheric oxygen & cools reaction zone (-78°C)
10 – 14 Seconds (4.5kg)
Asphyxiation risk in unventilated rooms; cryogenic frostbite
Clean Agent (HFC-227ea / FK-5-1-12)
Class A, B, C & Sensitive Electronics
Thermal heat absorption without chemical residue or residue damage
10 – 15 Seconds (2kg–4kg)
High cost; ineffective on deep-seated Class D metal fires
Mechanical Foam (AFFF)
Class A (Solids) & Class B (Hydrocarbons)
Aqueous film smothers liquid fuel surface and prevents vapor release
20 – 30 Seconds (9 Litres)
FATAL electrocution risk if applied to live electrical equipment
Water (Gas Cartridge / Stored Press.)
Class A ONLY (Wood, Paper, Textile)
High thermal latent heat cooling
40 – 60 Seconds (9 Litres)
EXPLOSIVE steam splattering on oil fires; electrocution on Class C
Wet Chemical (Class K)
Class K / F (Commercial Kitchen Fryers)
Alkaline potassium salt saponification creates thick soap foam
30 – 45 Seconds (6 Litres)
Do not use standard ABC powder on 200°C commercial fat fryers
9. Critical Operational DOs & DON'Ts During Extinguisher Deployment
Commit these field-tested operational rules to memory. In live workplace fire drills conducted across industrial plants in Jammu, Samba, and Kathua, following these rules is what separates successful incipient knockdown from catastrophic burns:
✓
CRITICAL DOs (Life-Saving Actions)
Immediate Emergency Protocol
✓
DO Sound the Alarm Before Touching the ExtinguisherShout fire, activate the nearest Manual Call Point (MCP), and alert your designated floor warden. Never fight a fire in secret.
✓
DO Verify Your Escape Path is ClearAlways keep your back facing an unblocked exit door. If heat or smoke intensifies, you can retreat immediately without turning around in darkness.
✓
DO Test-Squeeze the Lever from 3 Meters AwayGive the operating lever a momentary tap before reaching the fire to confirm pressure and verify that powder is discharging freely.
✓
DO Aim Strictly at the Lowest Base of the FuelDirect the discharge at the burning wood, oil puddle, or paper stack. Never waste extinguishing agent on upper flames.
✓
DO Back Away Facing the HazardOnce flames are knocked down, walk backward while keeping your eyes on the fuel bed in case latent heat causes sudden re-ignition.
✕
DANGEROUS DON'Ts (Fatal Errors)
Prohibited Evacuation Behaviors
✕
DON'T Squeeze the Lever While Pulling the PinClamping the handle locks the safety pin firmly in the valve body under tens of kilograms of friction, rendering it impossible to remove.
✕
DON'T Hold the Horn of a CO2 Cylinder with Bare HandsExpanding CO2 gas reaches -78.5°C, causing instant cryogenic frostbite and skin tearing. Hold the insulated handle only.
✕
DON'T Throw Water or Standard ABC Powder on Commercial FryersWater causes explosive steam eruptions of boiling oil. Use dedicated Class K wet chemical extinguishers engineered for saponification.
✕
DON'T Stand Downwind of the FireFacing into the wind blows superheated gases, blinding smoke, and toxic chemical powder straight into your eyes and lungs.
✕
DON'T Re-Hang a Partially Discharged ExtinguisherEven a 2-second discharge breaks the valve seat. Powder granules lodge in the rubber gasket, causing all pressure to bleed away within 24 hours.
10. Post-Discharge Protocols & Immediate IS 2190 Refilling in J&K
Once an incipient fire has been extinguished, operational safety duties are not over. Follow this immediate three-step protocol to prevent secondary incidents:
Step 1: Immediate Hazard Tagging. Never hang a used extinguisher back on its wall bracket or place it in a cabinet. Lay the cylinder horizontally on the floor or attach an orange DISCHARGED / OUT OF SERVICE tag immediately so that building occupants do not rely on an empty cylinder during a secondary emergency.
Step 2: Ventilation and Clean-Up. Ventilate the room by opening external windows and operating exhaust systems. For ABC dry chemical powder, vacuum using an industrial HEPA filter vacuum. Avoid water scrubbing immediately on electronics, as monoammonium phosphate is mildly acidic and hygroscopic.
Step 3: Professional Recharging & Hydro-Testing under IS 2190. Under Indian Standard IS 2190 Clause 12, every discharged extinguisher must be routed to a certified testing and refilling station. The cylinder shell must undergo internal optical inspection, the discharge valve must be disassembled and fitted with fresh EPDM O-rings, the siphon tube cleared of caked powder, and the cylinder recharged with certified MAP 50/90 dry chemical powder pressurized with pure, moisture-free dry nitrogen to 15.0 Bar.
BSS Fire Authorized Kanex Refilling & Pressure Testing Station in Jammu
Need emergency refilling, hydrostatic pressure testing (35 Bar), or on-site workplace P.A.S.S. fire drill training for your industrial facility in Bari Brahmana, Samba IGC, Kathua, or Jammu? Contact BSS Fire at +91-7006529259 or email bssfirejammu@gmail.com for certified IS 2190 compliance servicing.
Engineered Execution & Supply
Need Kanex ISI-Marked Fire Extinguishers & Refilling Services for Your Facility?
Consult directly with Jammu-based fire protection contractors for on-site survey and BOQ sizing.
How long does a standard 4kg or 6kg ABC dry powder fire extinguisher discharge?
A standard 4kg ABC dry chemical powder fire extinguisher empties completely within 13 to 17 seconds of continuous discharge. A 6kg extinguisher lasts approximately 16 to 22 seconds, and a 4.5kg CO2 cylinder discharges in 10 to 14 seconds. Because discharge time is extremely brief, aiming directly at the fuel base and executing steady side-to-side sweeps without hesitation is essential.
Why won't the fire extinguisher safety pin pull out during an emergency?
In 95% of cases where the pin is stuck, the user is inadvertently squeezing or resting their fingers on the upper operating lever. Squeezing the handle clamps the valve spindle directly against the pin shank with high friction, making it impossible to pull out. To release the pin, hold the extinguisher by the lower carry handle ONLY, give the pin ring a quarter-turn twist to break the plastic inspection seal, and pull straight out horizontally.
What is the correct standoff distance when using a fire extinguisher?
Under IS 2190 and NFPA standards, the recommended standoff distance is 6 to 8 feet (approximately 1.8 to 2.5 meters) from the front edge of the fire. Standing closer exposes you to intense radiant heat and risks splashing burning liquid fuels. Standing further than 3 meters causes the extinguishing stream to lose velocity before penetrating the thermal updraft.
Does a fire extinguisher need to be refilled if it was only sprayed for 2 seconds?
YES. Every fire extinguisher that has been actuated — even for a 1-second test burst — must be taken out of service and professionally refilled immediately. When the valve core unseats, microscopic dry chemical powder particles lodge between the valve rubber gasket and brass seat, preventing an airtight re-seal. Over the next 12 to 48 hours, internal nitrogen propellant bleeds to 0 Bar, leaving the cylinder completely useless during a real emergency.
Can I use a standard ABC dry chemical fire extinguisher on a commercial kitchen oil fryer?
No. Standard ABC dry powder extinguishers are not rated for commercial cooking oil fires (Class K / F). While ABC powder may temporarily suppress open flames, commercial cooking oil reaches temperatures exceeding 200°C–360°C. Without cooling and saponification, the oil immediately re-flashes violently. Dedicated Class K wet chemical extinguishers (potassium acetate/citrate based) are mandatory under IS 15683 to form an airtight soapy foam blanket that permanently cools and extinguishes burning grease.